Launch Arguments & Environment Variables
Walk into any American fast food establishment, and you’ll be greeted with a colorful, back-lit display of specials, set menus, and other a la carte items. But as those in-the-know are quick to point out, larger chains often have a secret menu, passed down by oral tradition between line cook workers and patrons over the generations.
At McDonald’s, one can order a “Poor Man’s Big Mac”, which transforms a double cheeseburger alchemy-like into the chain’s signature sandwich on the cheap.
At Chipotle, there is an unwritten rule that they’ll make anything within the scope of available ingredients. Since Mexican food is a testament to culinary combinatorics, an off-book order for a Quesadilla or Nachos is well within their wheelhouse.
In life, it’s all about knowing what to ask for.
Which brings us to Xcode Launch Arguments & Environment Variables. There are a number of options that can be passed into a target’s scheme to enable useful debugging behavior, but like a fast food secret menu, they’re obscure and widely unknown.
So this week on NSHipster, we’ll take a look at the hidden world of Xcode runtime configuration, so that you, dear reader, may also saunter up to the great lunch counter of Objective-C and order to your heart’s content.
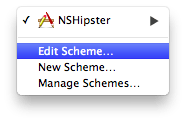
To enable launch arguments and set environment variables for your app, select your target from the Xcode toolbar and select “Edit Scheme…”

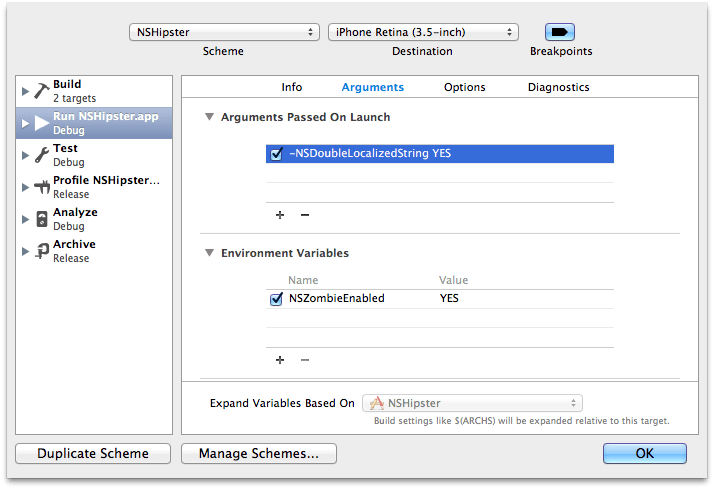
On the left side of the panel, select “Run [AppName].app”, and select the “Arguments” segment on the right side. There will be two drop-downs, for “Arguments Passed on Launch” and “Environment Variables”.

For the purposes of debugging an app target, launch arguments and environment variables can be thought to be equivalent—both change the runtime behavior by defining certain values. In practice, the main difference between the two is that launch arguments begin with a dash (-) and don’t have a separate field for argument values.
Arguments Passed on Launch
Any argument passed on launch will override the current value in NSUser for the duration of execution. While this can be used for domain-specific testing and debugging, the two most widely applicable use cases are for localization and Core Data.
Localization
Getting localization right is a challenging and time-consuming task in and of itself. Fortunately, there are a few launch arguments that make the process much nicer.
For more information about localization, check out our article about
NSLocalized.String
NSDoubleLocalizedStrings
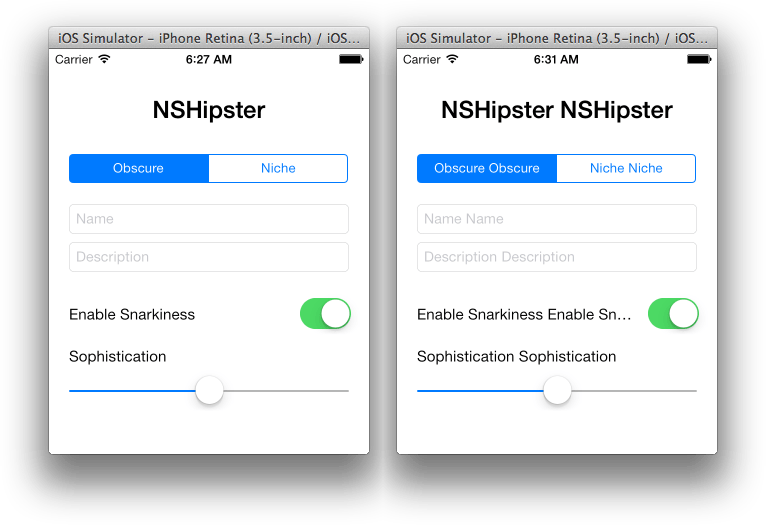
To simulate German’s UI-breaking götterdämmere Weltanschauung of long-compound-words-unbroken-by-breakable-whitespace, there’s NSDouble.
According to IBM’s Globalization Guidelines (Archived), we can expect translations from English to many European languages to be double or even triple the physical space of the source:
| Number of Characters in Text | Additional Physical Space Required |
|---|---|
| ≤ 10 | 100% to 200% |
| 11 – 20 | 80% to 100% |
| 21 – 30 | 60% to 80% |
| 31 – 50 | 40% to 60% |
| 51 – 70 | 31% to 40% |
| 70 | 30% |
While you’re waiting for the first batch of translations to come back, or are merely curious to see how badly your UI breaks under linguistic pressure, specify the following launch argument:
-NSDouble
NSShowNonLocalizedStrings
Project managers screaming at you to get localization finished? Now you can configure your app to scream at you as well!
If you pass the NSShow launch argument, any unlocalized string will SCREAM AT YOU IN CAPITAL LETTERS. HOW DELIGHTFUL!
-NSShowAppleLanguages
Perhaps the most useful launch argument of all, however, is Apple.
Normally, one would have to manually go through Settings > General > International > Language and wait for the Simulator or Device to restart. But the same can be accomplished much more simply with the following launch argument:
-AppleThe value for
Applecan either be the name of the language (“Spanish”), or its language code (Languages es), but since localization files are keyed by their ISO 639 code, using the code is preferable to the actual name of the language.
Core Data
Of all of the system frameworks, Core Data may be the most in need of debugging. Managed objects passing across contexts and threads, and notifications firing with dazzlingly fervor, there’s too much going on to keep track of yourself. Call in reinforcements with these essential launch arguments:
SQL Debug
Most Core Data stacks use SQLite as a persistent store, so if your app is anything like the majority, you’ll appreciate being able to watch SQL statements and statistics fly by as Core Data works its magic.
Set the following launch argument:
-com.apple.Core…and let the spice flow.
Corecom.apple.Core takes a value between 1 and 3; the higher the value, the more verbose the output. Adjust according to taste.
Syntax Colored Logging
Want your debug statements to be even spicier? Toss com.apple.Core into the mix and brace yourself for an explosion of color:
-com.apple.CoreMigration Debug
In any other persistence layer, migrations are a blessing. Yet, for some reason, Core Data manages to make them into something out of a nightmare. When things go wrong and you have no one to blame except your own ignorant self, unworthy of such an intuitive and well-designed ORM graph persistence framework, then here’s an argument you’ll want to pass at launch:
-com.apple.CoreEnvironment Variables
Whereas launch arguments are specific to the executable, environment variables have a wider scope, more along the lines of a global variable (but without all of the knee-jerk derision from programmers).
Configure your environment with the following settings to shape the memory management policies to aide in debugging.
Unless otherwise specified, environment variables are passed
YESorNOto enable or disable a particular feature.
Zombies!
Over-played in popular media, under-played in Objective-C, everyone can agree that it pays to know about zombies.
Setting NSZombie-related environment variables allows you to control the BRAAAAINS! of your app. To be more specific, when objects are deallocated, they become “zombified”, able to communicate any messages that are passed after they have been freed. This can be useful for tracing any errant EXC_BAD_ACCESS exceptions you get during execution.
| Name | Effect |
|---|---|
NSZombie |
If set to YES, deallocated objects are 'zombified'; this allows you to quickly debug problems where you send a message to an object that has already been freed. |
NSDeallocate |
If set to YES, the memory for 'zombified' objects is actually freed. |
Memory Allocator
The memory allocator includes several debugging hooks that can be enabled by environment variables. As explained in Apple’s Memory Usage Performance Guidelines:
Guard Malloc is a special version of the malloc library that replaces the standard library during debugging. Guard Malloc uses several techniques to try and crash your application at the specific point where a memory error occurs. For example, it places separate memory allocations on different virtual memory pages and then deletes the entire page when the memory is freed. Subsequent attempts to access the deallocated memory cause an immediate memory exception rather than a blind access into memory that might now hold other data. When the crash occurs, you can then go and inspect the point of failure in the debugger to identify the problem.
Here are some of the most useful ones:
| Name | Effect |
|---|---|
Malloc |
Fill allocated memory with 0xAA and scribble deallocated memory with 0x55. |
Malloc |
Add guard pages before and after large allocations. |
Malloc |
Record backtraces for each memory block to assist memory debugging tools; if the block is allocated and then immediately freed, both entries are removed from the log, which helps reduce the size of the log. |
Malloc |
Same as Malloc but keeps all log entries. |
I/O Buffering
Although unlikely, you may come across a situation where you want logging to stdout to be unbuffered (ensuring that the output has been written before continuing). You can set that with the NSUnbuffered environment variable:
| Name | Effect |
|---|---|
NSUnbuffered |
If set to YES, Foundation will use unbuffered I/O for stdout (stderr is unbuffered by default). |
Just as secret menus are bound by the implications of Gödel’s Incompleteness Theorem, it is impossible to document all of the secret incantations to get special treatment in Xcode. However, perhaps you can find a few more (and learn a ton about runtime internals) by perusing Apple’s Technical Note TN2239: iOS Debugging Magic and Technical Note TN2124: OS X Debugging Magic.
Hopefully, though, the secret knowledge you’ve been exposed to in this article will sustain you in your app endeavors. Use them wisely, and pass them onto your coworkers like an urban legend or juicy rumor.