CloudKit
As an iOS developer, if you want to make an application on your own, you sometimes need to write back-end code. Even for the developer who can take that on, there is more than just the code, there’s also maintenance. Your worst fear becomes not that people might not like your application, but that your server might fail under heavy traffic.
Fortunately, we now have CloudKit. Apple takes care of all these details, so you can focus on how to make your application great.
What is CloudKit?
Perhaps you’ve heard of iCloud Drive before—iCloud Drive is where we can store our user’s data and files for easy access from other devices. CloudKit is the framework that helps us do this easily in the apps we create.
CloudKit offers tons of APIs to access iCloud. You can create a user model inside your application linked to a user’s iCloud account. Meanwhile, you can have a public global database to store application-level data. You can also save large files and bulk data into iCloud Drive, so your users can use their data from their other devices. This works just like working on local files, but with all the operations sent to the cloud.
Overall, CloudKit is a framework that replaces back-end web services like old-school databases, file storage, and user authentication systems. With CloudKit’s help you don’t need to worry about any of these, so you can focus your energy on your application.
Get into CloudKit
Imagine that you’re working on a check-in application where users can add “places” with their location and check in at these places. We’ll talk about how to build some basic functions of the check-in application with CloudKit.
Enable CloudKit
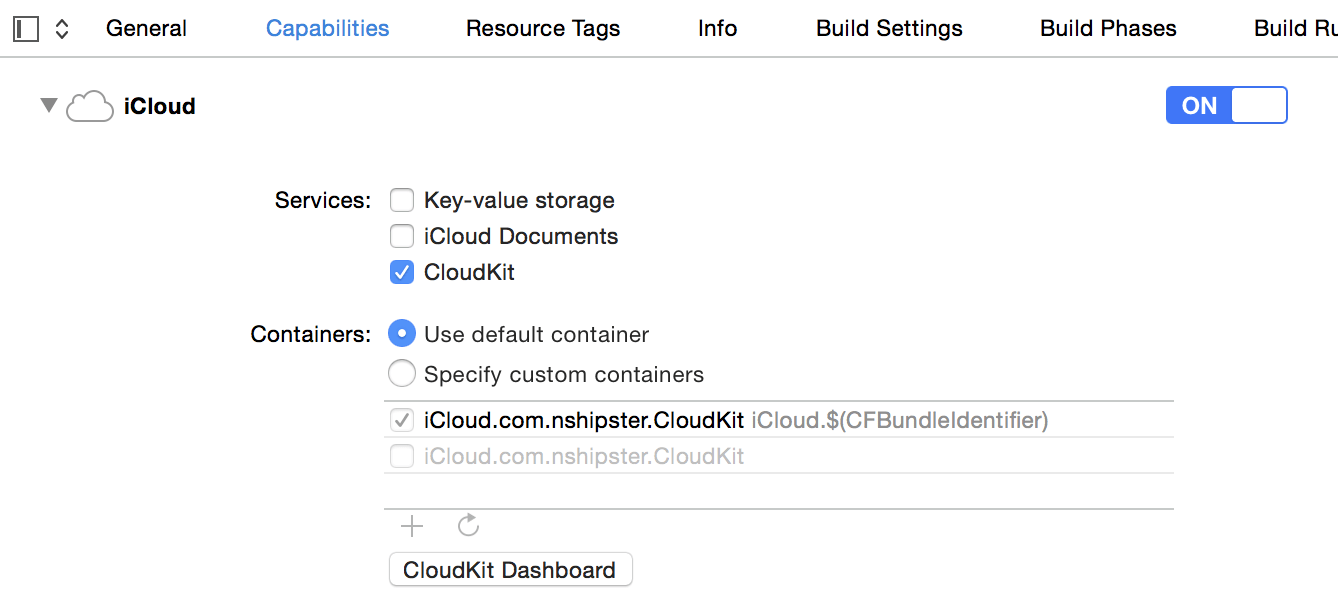
We have already talked about how powerful CloudKit is, now it is the time to show you how to use it. It’s simple. All you need is to turn on i and check Cloud in the project panel of Xcode:
Fundamental CloudKit Objects
There are 7 different fundamental objects in CloudKit. You may have seen this elsewhere in your programming career, but there are some slight differences.
-
CKContainer: A container is like a sandbox. An application can only use the resources inside its container. The container is located at the very outer border and each application has one and only one separate container. (You can allow other applications to access your container by configuring CloudKit Dashboard.) -
CKDatabase: A database is the place that you put all your data. There are two different kinds of databases: private and public. The private database is where you store sensitive data, like user’s information. The public database is where you store shared data. For example, in our check-in application, you would store a user’s birthday and check-ins in the private database but store “places” information in the public database. -
CKRecord: A record is a piece of data inside your database. It is stored as a key-value pair. For now, you can saveNSString,NSNumber,NSData,NSDate,CLLocation,CKReference, andCKAsset, as well as arrays of all the types listed above. -
CKRecord: Records are not stored scattered in a database, they are located in record zones. Every application has a default record zone, and you can also have your own custom record zones.Zone -
CKRecord: the unique label of a record, used for locating a particular record.Identifier -
CKReference: Reference is like the relationship in an RDBMS. In our check-in example, there may be many people checked in at the same place, so we’ll need to establish a reference between places and check-ins. -
CKAsset: Assets are resources, like binary files or bulk data. For example, a user’s picture should be stored as an asset.
Convenience API
CloudKit’s convenience API is there to do basic operations such as reading, writing, and editing records.
Let’s work on our check-in application. To get started, import the CloudKit framework and get a reference to the public database:
import Cloud#import <CloudNext, create a new place and save it:
let greatCKRecordCloudKit will connect to the Internet asynchronously when save method is invoked. Remember to handle the error in the block, since the user’s connection may be unstable. A good application deserves perfect error handling logic.
You should check the error code of the NSError object to detect which kind of error you are dealing with. A CKError error may occur if you were on a bad internet connection, and what you need to do is to retry the operation after failure. But when to retry? Immediately or 10 seconds later? Don’t worry, CloudKit offers a suggestion in the error’s user dictionary with the key CKError:
if let retrydouble retryHere I’ll read the place’s information back:
let greatCKRecordAnd here I’ll edit an existing place’s information:
let greatCKRecordThe progress of editing a record is pretty simple: read, edit, then save. What you should really pay attention to is how to do the three-step updating process, especially when updating one record depends on fetching others.
A bad practice:
database.fetch[database fetchWith very complex nested operations you may run into a dilemma: There are three (or more) blocks and three (or more) errors to handle, so where should you handle the errors? where should you retry the operation if an error occurs? All together it starts looking like kind of a disaster.
A better approach is to use NSOperation dependencies to manage the dependent tasks:
let firstCKFetchYou can finish almost all the work you need to do with the convenience API. What do you think so far? It’s much easier than writing backend code, maintaining a server, and writing the code to communicate with it.
Advanced Features
Queries
While powerful, the convenience APIs aren’t quite enough to finish our check-in application—now it’s time to add search functionality. To add a search function, you will need a query. A CKQuery object is made up of Record, NSPredicate and NSSort.
NSPredicateplays an important role here, handling string matching, location and date ranging, and combinations of simple queries. Refer to theCKQuerydocumentation for more.
Let’s say I want all places containing the name ‘Apple Store’:
let predicate = NSPredicate(format: "name CONTAINS 'Apple Store'")
let query = CKQuery(recordNSPredicate *predicate = [NSPredicate predicateAlternately, you could modify the query to retrieve all the places within one mile around the user.
Subscriptions
After adding queries, our application is almost complete. Or wait, did we forget something?
Yes: notifications. They’re a critical part of any check-in application.
For example, a social person may want to be notified if someone mentions “party” around him or her. This is possible with CloudKit—the framework already provides something to achieve this using the CKSubscription class:
let predicate = NSPredicate(format: "description CONTAINS 'party'")
let subscription = CKSubscription(recordCKDatabase *publicReceiving the notification is handled by the application delegate:
func application(application: UIApplication, did- (void)application:(UIApplication *)application didMore
As I said in the beginning, CloudKit can do much more than described in this article. You can allow your users to add pictures to their check-ins. References in CloudKit allow you to get all the related check-ins for certain places. Moreover, CloudKit has an API that allows you to find your users’ friends who are also using your application via their address book.
Can’t wait to try out CloudKit? It could free you from writing backend code, caring about server pressure, maintaining a large CDN network, renting a server, and more. But wait—what about the price? How much does it cost? The answer is: free. Apple allows using CloudKit for 10 GB of resource storage, 100 MB of data storage, and 2 GB of daily transfer, scaling with your user base up to to 1 petabyte of resources, 10 TB database, and 200 TB transfer.
Check out the CloudKit cost calculator at the bottom of the page for detailed free limits and pricing.
As of WWDC 2015, CloudKit is not only available on iOS or OS X. You can now integrate CloudKit JS with your website to make it possible for iCloud users to enjoy your service in a web browser or use the CloudKit web service to communicate with CloudKit servers directly via HTTP request. All this means it’s now possible to use CloudKit from any other mobile or desktop platform!
CloudKit is an amazing thing. I can’t wait to see the awesome applications you NSHipsters make with it.