CMDeviceMotion
Beneath the smooth glass of each iPhone an array of sensors sits nestled on the logic board, sending a steady stream of data to a motion coprocessor.
The Core Motion framework makes it surprisingly easy to harness these sensors, opening the door to user interactions above and beyond the tapping and swiping we do every day.
Core Motion lets you observe and respond to changes in the position and orientation of an iOS or watchOS device. Thanks to their dedicated motion coprocessor, iPhones, iPads, and Apple Watches can continuously read and process inputs from built-in sensors without taxing the CPU or draining the battery.
Accelerometer and gyroscope data is projected into a 3D coordinate space, with the center of the device at the origin.
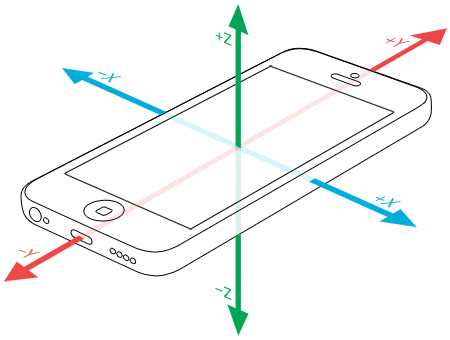
For an iPhone held in portrait orientation:
- The X-axis runs the width of the device from left (negative values) to right (positive values),
- The Y-axis runs the height of the device from bottom (-) to top (+),
- The Z-axis runs perpendicularly through the screen from the back (-) to the front (+).
CMMotionManager
The CMMotion class is responsible for
providing data about the motion of the current device.
To keep performance at the highest level,
create and use a single shared CMMotion instance throughout your app.
CMMotion provides four different interfaces for sensor information,
each with corresponding properties and methods
to check hardware availability and access measurements.
- The accelerometer measures acceleration, or changes in velocity over time.
- The gyroscope measures attitude, or the orientation of the device.
- The magnetometer is essentially a compass, and measures the Earth’s magnetic field relative to the device.
In addition to these individual readings,
CMMotion also provides a unified “device motion” interface,
which uses sensor fusion algorithms to combine readings
from each of these sensors into a unified view of the device in space.
Checking for Availability
Although most Apple devices these days come with a standard set of sensors, it’s still a good idea to check for the capabilities of the current device before attempting to read motion data.
The following examples involve the accelerometer, but you could replace the word “accelerometer” for the type of motion data that you’re interested in (such as “gyro”, “magnetometer”, or “deviceMotion”):
let manager = CMMotionPush vs. Pull
Core Motion provides both “pull” and “push” access to motion data.
To “pull” motion data,
you access the current reading from
using one of the read-only properties of CMMotion.
To receive “pushed” data, you start the collection of your desired data with a closure that receives updates at a specified interval.
Starting Updates to “pull” Data
manager.startAfter this call,
manager.accelerometer is accessible at any time
with the device’s current accelerometer data.
manager.accelerometerYou can also check whether motion data is available by reading the corresponding “is active” property.
manager.isStarting Updates to “push” Data
manager.startThe passed closure is called at the frequency provided by the update interval. (Actually, Core Motion enforces a minimum and maximum frequency, so specifying a value outside of that range causes that value to be normalized; you can determine the effective interval rate of the current device by checking the timestamps of motion events over time.)
Stopping Updates
manager.stopAccelerometer in Action
Let’s say we want to give the splash page of our app a fun effect, such that the background image remains level no matter how the phone is tilted.
Consider the following code:
if manager.isFirst, we check to make sure our device makes accelerometer data available.
Next we specify a high update frequency.
And then finally,
we begin updates to a closure that will rotate a UIImage property:
Each CMAccelerometer object includes an x, y, and z value —
each of these shows the amount of acceleration in G-forces
(where 1G = the force of gravity on Earth)
for that axis.
If your device were stationary and standing straight up in portrait orientation,
it would have acceleration (0, -1, 0);
laying flat on its back on the table,
it would be (0, 0, -1);
tilted forty-five degrees to the right,
it would be something like (0.707, -0.707, 0) (dat √2 tho).
We calculate the rotation with the
two-argument arctangent function (atan2)
using the x and y components from the accelerometer data.
We then initialize a CGAffine using that calculate rotation.
Our image should stay right-side-up, no matter how the phone is turned —
here, it is in a hypothetical app for the National Air & Space Museum
(my favorite museum as a kid):
The results are not terribly satisfactory — the image movement is jittery, and moving the device in space affects the accelerometer as much as or even more than rotating. These issues could be mitigated by sampling multiple readings and averaging them together, but instead let’s look at what happens when we involve the gyroscope.
Adding the Gyroscope
Rather than use the raw gyroscope data that we would get
by calling the start method,
let’s get composited gyroscope and accelerometer data
by requesting the unified “device motion” data.
Using the gyroscope,
Core Motion separates user movement from gravitational acceleration
and presents each as its own property of the CMDevice object.
The code is very similar to our first example:
if manager.isMuch better!
UIClunkController
We can also use the other, non-gravity portion
of this composited gyro / acceleration data
to add new methods of interaction.
In this case, let’s use the user property of CMDevice
to navigate backward whenever
the user taps the left side of the device against their hand.
Remember that the X-axis runs laterally through the device in our hand, with negative values to the left. If we sense a user acceleration to the left of more than 2.5 Gs, that’s our cue to pop the view controller from the stack. The implementation is only a couple lines different from our previous example:
if manager.isWorks like a charm!
Tapping the device in a detail view immediately takes us back to the list of exhibits:

Getting an Attitude
Better acceleration data isn’t the only thing we gain
by including gyroscope data:
we now also know the device’s true orientation in space.
This data is accessed via the attitude property of a CMDevice object
and encapsulated in a CMAttitude object.
CMAttitude contains three different representations of the device’s orientation:
- Euler angles,
- A quaternion,
- A rotation matrix.
Each of these is in relation to a given reference frame.
Finding a Frame of Reference
You can think of a reference frame as the resting orientation of the device from which an attitude is calculated. All four possible reference frames describe the device laying flat on a table, with increasing specificity about the direction it’s pointing.
-
CMAttitudedescribes a device laying flat (vertical Z-axis) with an “arbitrary” X-axis. In practice, the X-axis is fixed to the orientation of the device when you first start device motion updates.Reference Frame XArbitrary ZVertical -
CMAttitudeis essentially the same, but uses the magnetometer to correct possible variation in the gyroscope’s measurement over time.Reference Frame XArbitrary Corrected ZVertical -
CMAttitudedescribes a device laying flat, with its X-axis (that is, the right side of the device in portrait mode when it’s facing you) pointed toward magnetic north. This setting may require the user to perform that figure-eight motion with their device to calibrate the magnetometer.Reference Frame XMagnetic North ZVertical -
CMAttitudeis the same as the last, but it adjusts for magnetic / true north discrepancy and therefore requires location data in addition to the magnetometer.Reference Frame XTrue North ZVertical
For our purposes, the default “arbitrary” reference frame will be fine (you’ll see why in a moment).
Euler Angles
Of the three attitude representations, Euler angles are the most readily understood, as they simply describe rotation around each of the axes we’ve already been working with.
-
pitchis rotation around the X-axis, increasing as the device tilts toward you, decreasing as it tilts away -
rollis rotation around the Y-axis, decreasing as the device rotates to the left, increasing to the right -
yawis rotation around the (vertical) Z-axis, decreasing clockwise, increasing counter-clockwise.
Each of these values follows what’s called the “right hand rule”: make a cupped hand with your thumb pointing up and point your thumb in the direction of any of the three axes. Turns that move toward your fingertips are positive, turns away are negative.
Keep It To Yourself
Lastly, let’s try using the device’s attitude to enable a new interaction for a flash-card app designed to be used by two study buddies. Instead of manually switching between the prompt and the answer, we’ll automatically flip the view as the device turns around, so the quizzer sees the answer while the person being quizzed sees only the prompt.
Figuring out this switch from the reference frame would be tricky.
To know which angles to monitor,
we would somehow need to account for the starting orientation of the device
and then determine which direction the device is pointing.
Instead, we can save a CMAttitude instance
and use it as the “zero point” for an adjusted set of Euler angles,
calling the multiply(by method
to translate all future attitude updates.
When the quizzer taps the button to begin the quiz,
we first configure the interaction
(note the “pull” of the deviceMotion for initial):
// get magnitude of vector via Pythagorean theorem
func magnitude(from attitude: CMAttitude) -> Double {
return sqrt(pow(attitude.roll, 2) +
pow(attitude.yaw, 2) +
pow(attitude.pitch, 2))
}
// initial configuration
var initialThen,
in our now familiar call to start,
we calculate the magnitude of the vector described by the three Euler angles
and use that as a trigger to show or hide the prompt view:
if manager.isHaving implemented all that, let’s take a look at the interaction. As the device rotates, the display automatically switches views and the quizee never sees the answer:
Further Reading
I skimmed over the
quaternion and
rotation matrix
components of CMAttitude earlier,
but they are not without intrigue.
The quaternion, in particular,
has an interesting history,
and will bake your noodle if you think about it long enough.
Queueing Up
To keep the code examples readable, we’ve been sending all of our motion updates to the main queue. A better approach would be to schedule these updates on their own queue and dispatch back to main to update the UI.
let queue = OperationRemember that not all interactions made possible by Core Motion are good ones. Navigation through motion can be fun, but it can also be hard to discover, easy to accidentally trigger, and may not be accessible to all users. Similar to purposeless animations, overuse of fancy gestures can make it harder to focus on the task at hand.
Prudent developers will skip over gimmicks that distract and find ways to use device motion that enrich apps and delight users.