Guided Access
Accessibility features on iOS are more like superpowers than assistive technologies. Open the Settings app and navigate to General > Accessibility and you’ll find a treasure trove of functionality, capable of feats otherwise impossible on a platform as locked down as iOS.
Want to use your iPhone as a magnifying glass? Turn on Magnifier for a convenient way to zoom in on small details with your camera.
Care to learn the contents of a webpage without as much as glancing at your screen? Enable “Speak Screen” or “Speak Selection” to have the page dictated, not read.
Disagree with the aesthetic direction of iOS since Jony Ive took over UI design in version 7? With just a few taps, you can do away with frivolous transparency and motion effects and give buttons the visual distinction they deserve.
But venture down to the bottom of the accessibility settings menu, and you’ll find arguably the most obscure among these accessibility features: Guided Access.
What is it? Why is it useful? How can you build your app to better support it?
Read on, and let NSHipster be your guide.
What Is Guided Access?
Guided Access is an accessibility feature introduced in iOS 6 that restricts user interactions within an app.
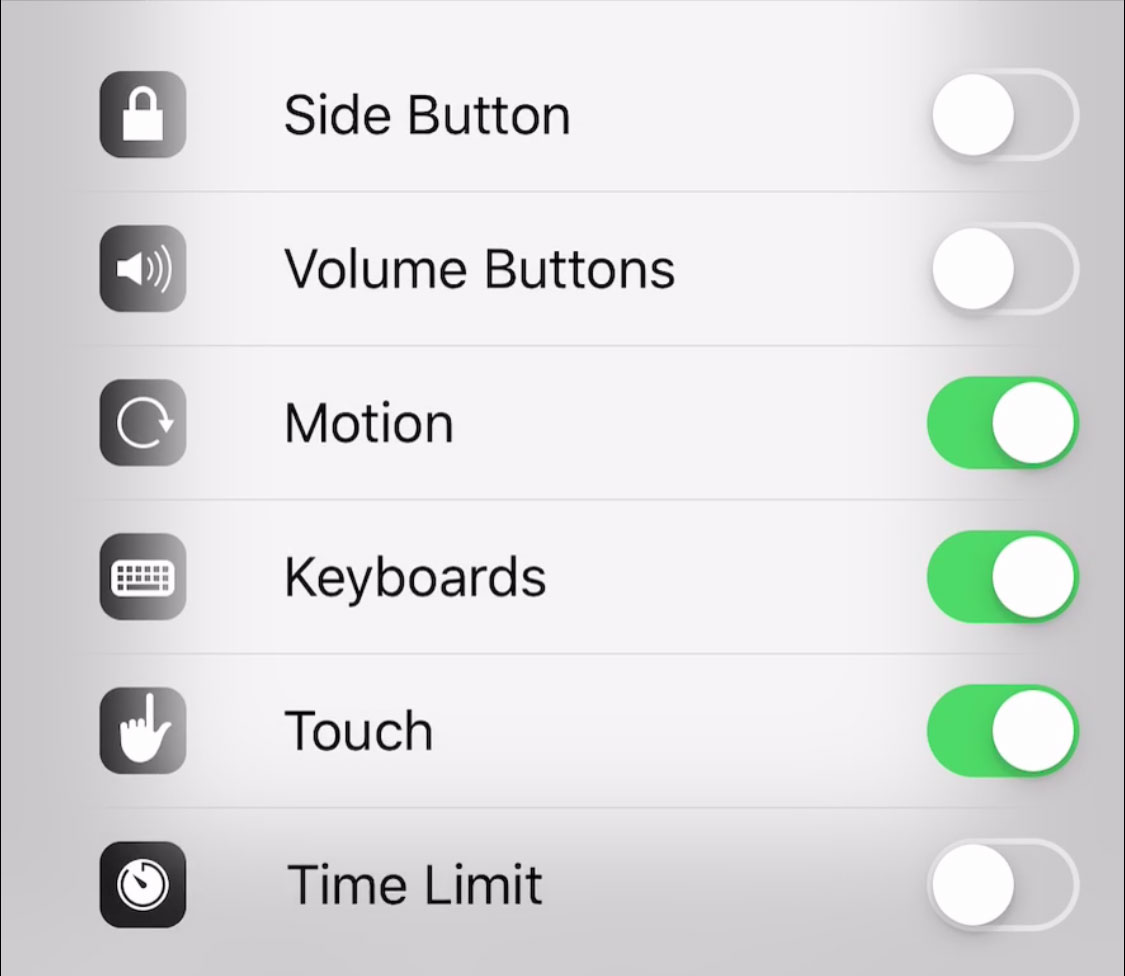
When a Guided Access session is started, the user is unable to close the app until the session is ended (either by entering a passcode or authenticating with Face ID or Touch ID). Additionally, a Guided Access session can be configured to block interactions with designated screen regions and allow or deny any combination of the following features:
- Sleep / Wake Button: Prevent the screen and device from being turned off
- Volume Buttons: Disable hardware volume buttons
- Motion: Ignore device rotation and shake gestures
- Keyboards Don’t show the keyboard
- Touch Ignore screen touches
- Time Limit Enforce a given time limit for using the app
Why is Guided Access Useful?
With a name like “Guided Access”, it’s not immediately clear what this feature actually does. And its section heading “Learning” doesn’t help much, either — though, to be fair, that isn’t an inaccurate characterization (Guided Access is undoubtedly useful for people with a learning disability), but it certainly buries the lede.
In truth, Guided Access can be many things to many different people. So for your consideration, here are some alternative names that you can keep at the back of your mind to better appreciate when and why you might give it a try:
“Kid-Proof Mode”: Sharing Devices with Children
If you have a toddler and want to facilitate a FaceTime call with a relative, start a Guided Access session before you pass the device off. This will prevent your little one from accidentally hanging up or putting the call on hold by switching to a different app.
“Adult-Proof Mode”: Sharing Devices with Other Adults
The next time you go to hand off your phone to someone else to take a photo, give it a quick triple-tap to enter Guided Access mode first to forego the whole “Oops, I accidentally locked the device” routine.
“Crowd-Proof Mode”: Displaying a Device in Kiosk Mode
Have a spare iPad that you want to allows guests to sign-in at an event? Guided Access offers a quick and effective way to keep things moving.
“You-Proof Mode”: Focus Your Attention on a Device
Guided Access can be helpful even when you aren’t handing off the device to someone else:
If you’re prone to distraction and need to focus on study or work, Guided Access can help keep you on track. Conversely, if you’re kicking back and enjoying a game on your phone, but find the touch controls to be frustratingly similar to built-in iOS gestures, you can use Guided Access to keep you safely within the “magic circle”. (The same goes for anyone whose work looks more like play, such as digital musicians and other performers.)
Setting Up Guided Access
To set up Guided Access, open the Settings app, navigate to General > Accessibility > Guided Access, and enable the switch labeled Guided Access.
Next, tap Passcode Settings, and enter (and reenter) the passcode that you’ll use to end Guided Access sessions.
Starting a Guided Access Session
To start a Guided Access session, triple-click the home button (or, on the iPhone X and similar models, the side button). Alternatively, you can start a session by telling Siri “Turn on Guided Access”.
From here, you can trace regions of the screen for which user interaction is disabled, and configure which of the aforementioned features are allowed.
As far as accessibility features are concerned, Guided Access is the least demanding for developers: Nearly all are compatible as-is, without modification.
However, there are ways that you might improve — and even enhance — Guided Access functionality in your app:
Detecting When Guided Access is Enabled
To determine whether the app is running within a Guided Access session,
access the is type property
from the UIAccessibility namespace:
UIAccessibility.isYou can use Notification to subscribe to notifications
whenever a Guided Access session is started or ended
by observing for UIAccessibility.guided.
NotificationAll of that said: most apps won’t really be an actionable response to Guided Access sessions starting or ending — at least not unless they extend this functionality by adding custom restrictions.
Adding Custom Guided Access Restrictions to Your App
If your app performs any destructive (i.e. not easily reversible) actions that aren’t otherwise precluded by any built-in Guided Access restrictions, you might consider providing a custom restriction.
To get a sense of what these might entail, think back to the previous use-cases for Guided Access and consider: Which functionality would I might not want to expose to a toddler / stranger / crowd? Some ideas that quickly come to mind are deleting a photo from Camera Roll, overwriting game save data, or anything involving a financial transaction.
A custom restriction can be enabled or disabled as part of a Guided Access session like any of the built-in restrictions. However, unlike the ones that come standard in iOS, it’s the responsibility of your app to determine how a restriction behaves.
Let’s take a look at what that means in code:
Defining Custom Guided Access Restrictions
First,
create an enumeration with a case
for each restriction that you want your app to support.
Each restriction needs a unique identifier,
so it’s convenient to make that the raw.
Conformance to Case in the declaration here
automatically synthesizes an all type property that we’ll use later on.
For this example, let’s define a restriction that, when enabled, prevents a user from initiating a purchase within a Guided Access session:
enum Restriction: String, CaseAdopting the UIGuidedAccessRestrictionDelegate Protocol
Once you’ve defined your custom restrictions,
extend your App to adopt
the UIGuided protocol,
and have it conform by implementing the following methods:
guidedAccess Restriction Identifiers textFor Guided Access Restriction(with Identifier:) -
detail(optional)Text For Guided Access Restriction(with Identifier:) guidedAccess Restriction(with Identifier:did Change:)
For guided,
we can simply return a mapping of the raw for each of the cases.
For text,
one convenient pattern is to leverage optional chaining
on a computed text property.
import UIKit
extension Restriction {
var text: String {
switch self {
case .purchase:
return NSLocalizedThe last protocol method to implement is
guided,
which notifies our app when access restrictions are turned on and off.
func guidedMost of the responsibility falls on each view controller in determining how to respond to this kind of change. So here, we’ll rebroadcast the message as a notification.
The existing UIAccessibility.guided
fires when Guided Access is switched on or off,
but it’s unclear from the documentation what the contract is for
changing options in a Guided Access session without entirely ending it.
So to be safe,
we’ll define additional notifications that we can use to respond accordingly:
extension UIAccessibility {
static let guidedResponding to Changes in Custom Guided Access Restrictions
Finally, in our view controllers, we’ll register for all of the guided access notifications we’re interested in, and define a convenience method to respond to them.
For example,
Product has a puchase outlet
that’s configured according to the custom .purchase restriction
defined by the app:
import UIKit
class ProductAccessibility is an important issue for developers — especially for mobile and web developers, who are responsible for designing and implementing the digital interfaces on which we increasingly depend.
Each of us, (if we’re fortunate to live so long), are almost certain to have our ability to see or hear diminish over time. “Accessibility is designing for our future selves”, as the popular saying goes.
But perhaps it’d be more accurate to say
“Accessibility is designing for our future selves our day-to-day selves“.
Even if you don’t identify as someone who’s differently-abled, there are frequently situations in which you might be temporarily impaired, whether it’s trying to read in low-light setting or listen to someone in a loud environment or interact with a device while holding a squirming toddler.
Features like Guided Access offer a profound reminder that accessibility features benefit everyone.